Subfloor - The make-or-break element for your Hardwood Flooring
Solid hardwood flooring is an excellent choice that promises to offer an array of practical benefits as well as add long-term value to your home. Hence, certain decisions must be made in order to protect such a valuable investment with the proper subfloor.
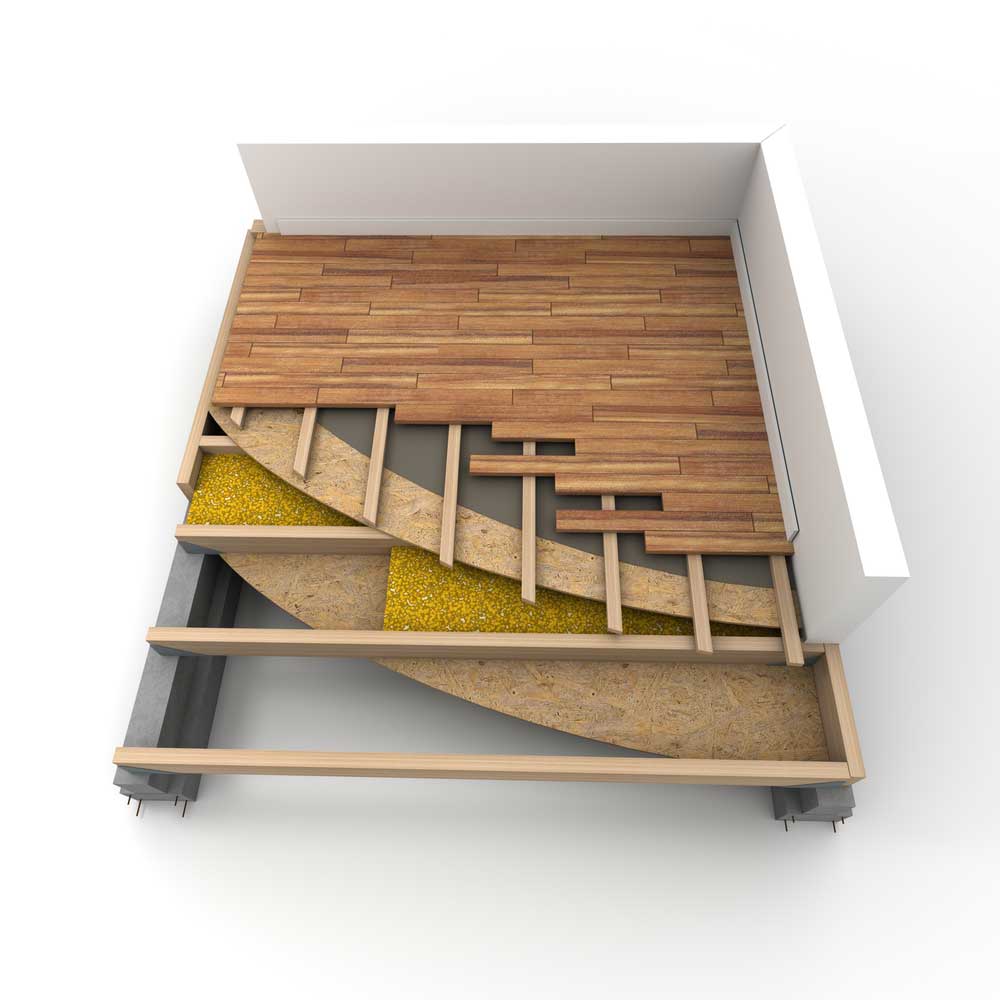
Regardless of how resilient the type hardwood flooring you have selected, it is important to support it with a strong subfloor, which ensures the overall performance of the flooring system and prevents squeaking, buckling and an uneven surface.
Wooderra provides you with a subfloor guide to help you gain a better understanding of the crucial elements involved in the installation of a reliable subfloor.
I. Before proceeding with any installation, ask yourself:
1. What type of flooring will be installed?
If a commercial floor is chosen, in general, it has a smooth surface and will show any subfloor defects. A common rule-of-thumb is a subfloor flatness of 3/16 of an inch in 10 feet.
2. Is it a new installation or remodeling project?
Find out what flooring was installed previously, the method in which it was removed if this is a remodel.
3. What condition is the subfloor in?
Here are the five key words you and your contractor should focus on in the preparation of the subfloor. This will be further explained later on in the article.
- Dry
- Leve
- Structurally soun
- Clean
- Smooth
II, Where is the floor grade level?
"Grade levels" often refer to the different levels of your home. Why is it important? The reason is that the type of installation of your hardwood flooring will be dictated by where the installation is going to take place.
The grade level is classified this way: above grade, on grade, and below grade - from highest level to lowest level. For instance, the ground level on which you walk into from the front door of your home is called "on grade". Above it is "above grade", and vertically downward, below "on grade" is "below grade", in other words, basement level.
-
An on-grade installation: Important things to consider are, in addition to the subfloor, is also the efficiency of the ventilation underneath in any crawlspace or basement. Made from organic materials, hardwood floors are continuously affected by the surrounding environment, especially by the moisture underneath the floor, as well as on the top surface.
-
An above-grade installation: It is necessary to check whether or not the rigidity of the underlayment layer is sufficient to support the hardwood flooring installation.
-
A below-grade installation: In these circumstances, moisture levels are typically higher. Hence, this should be one of the determinant factors on your search of hardwood flooring options, as not all hardwood species can endure high amounts of moisture. Excessive moisture levels translate into warp and swell for hardwood floors. Then again, if your mind is set for a hardwood floor in below-grade level, there is only a limited number of solid hardwood species that can withstand more moisture than others, including exotic hardwood flooring and the noblest of all - teak flooring.
III, How to prepare subfloor
For a successful installation of your hardwood flooring project, the foundation must be solid. In the preparation of subfloor, the crucial components to examine and achieve are: moisture content, structural integrity, and a flat, even surface.
-
Moisture content
-
Structural integrity
-
A clean, flat and even surface
- Firstly, take the board you are using as a straight edge
- Next, apply the patch that is sufficient to fill the target gap or gouge
- Lastly, with one person on each end, pull the board back and forth over the target area for the patch to be spread. This is called screeding.
- Let the screed dry completely after filling all the gaps. Check for flatness and sand if necessary.
It refers to the amount of moisture held within a particular material. What's more, moisture content is relevant to both wood and concrete. Concrete is mentioned here because typically, most wood sub-floors are installed on top of concrete slabs. This is particularly true in tropical climates such as Panama, Costa Rica and other Latin American countries in the tropics.
Moisture is contained in the wood's walls and nucleus, while every concrete mixture also holds a certain amount of water. Moreover, concrete pulls moisture from the air and ground, making solid wood floors installed over it more vulnerable to moisture, especially when the installation is placed at or below grade.
It is advisable to keep both the subfloor and concrete dry prior to the installation of any flooring on top. So the question now is how do make this determination without moisture testing? A moisture meter can come in handy. In fact, for every 1,000 square ft., a minimum meter reading of 20 in subfloor is recommended by the National Wood Flooring Association, while concrete's moisture content should not exceed 4%.
Some common moisture content test devices that are subfloor-friendly include Tramex Concrete Moisture Encounter meter, Calcium Chloride test, and Polyfilm test.
If the area where the construction is located is not of super low humidity such as all tropical locations like Panama, Costa Rica and other tropical countries, it is advisable to make use of underlayment that is accompanied with a moisture barrier. The order of the materials used typically goes from the bottom on up as follows: concrete, underlayment, subfloor, and hardwood floor.
Underlayment is a sort of structural layer of cement, cork, or plywood board, on top of which the flooring rests. Although it is not always essential for flooring installation, underlayment does contribute to leverage the overall performance of your hardwood floors in certain cases.
Underlayment comes in rolls and are typically rolled out to cover the entire floor, with each roll's edge to be joined with a special tape. In certain cases, the finished flooring requires a specific type of underlayment. So, check with your flooring manufacturer whether the placement of underlayment would be necessary and useful for your Project.
How well your hardwood flooring performs depends greatly on your subfloor's integrity. First, sweep the area and then take a close look. Remove any nails or screw heads. If it is not possible to level and countersink these nails or screw heads, replace them. Walk on the surface. Do you hear any squeaks or detect any spongy or hollow areas? If the answer is yes, it might be due to a weak spot in the concrete below, which should be addressed before the installation proceeds. Typically, the recommended subfloor's thickness is ¾". Double check with the flooring installer so that all requirements regarding thickness and width are met.
Make sure your subfloor is broom cleaned, smooth, and scraped. There should be no wax, oil, debris or paint.
Specifically, subfloors should be approximately 3/16 of an inch over 8 to 10 foot span. This means there should be no dips that are beyond 3/16 of an inch within 8 to 10 foot range. When you search for uneven spots, get a flat 8-10 foot plank, lay it out, and mark trouble spots as you move it across the entire floor.
Don't panic if you find some minor bumps on the subfloor. They can be sanded down using a rented or hand-held orbital sander. Remember to wear protective goggles and a dust mask while sanding, as the work produces a lot of dust.
In terms of dealing with dips, gouges and imperfections, you can fix them by using a leveling compound made of cement. You would mix it, following the manufacturer's instructions, and patch the subfloor with it. Mixing floor patch requires similar consistency to mixing pancake batter. Follow these steps to floor patch evenly:
Note: Avoid using large areas of floor patch if your hardwood floor is to be nailed and stapled, as the patch will crack.
IV, Types of subfloors under hardwood floors
1. Concrete slabs
Some flooring manufacturers are fond of installing their product over slabs with a glue-down application. In these cases, a moisture-vapor retarder is required for installation. Concrete's required weight must be no lower than 3,000 psi. Lightweight concrete slabs are usually not recommended, however, if this is the only option, OSB or plywood subfloor panels need to be installed. To check whether it is lightweight concrete or not, drag a nail or sharp object across the slab - if an impression is left on the surface, the answer is positive. What's more, concrete slab installation should not be done without a concrete moisture test. From the bottom of a slab, moisture migrates to the surface and then evaporates, according to relative humidity's changes. The internal moisture in concrete slabs must be allowed to dry appropriately; otherwise, problems related to adhesives and flooring products will are probable. Keep in mind that knowing the level of surface moisture content alone does not reflect the whole internal slab moisture levels. Thus, use relative humidity testing. Most hardwood flooring brands installation over concrete can be done when the concrete slab has been installed with plywood or OSB subflooring panels. Consult with the manufacturer for any specific requirements.
2. Plank subfloors
This particular type of subfloor is made up with ¾" thick southern yellow pine planks. Plank subfloor is installed by nailing these thick boards to the -- joists. It is commonly found in old structures and because of the planks' expansion and contraction over time, plank subfloors loosen over time. Prior to any solid hardwood flooring covering, do not forget to re-secure these planks to the floor using 2-1/2" deck screws. How your finished hardwood floor performs depends greatly on how sound and secure these planks lie underneath. It is important to avoid installing solid hardwood flooring parallel to the direction of the plank subfloor. This will cause the new hardwood floors to separate over time, resulting in open gaps and waviness. Hardwood flooring must be installed at 90 degree angle across the subfloor planks to stabilize the whole floor structure. To make this angle work, an additional layer of 3/8" thick plywood underlayment must be installed, glued, and screwed down over the plank subfloor.
3. OSB (Oriented Strand Board) Subfloor
A bunch of wood chips glued together form OSB subfloor. Installation consist of gluing and nailing the OSB sheets to the floor joists. Unlike plank subfloor, OSB subfloor is more flexible, as solid hardwood flooring can be directly installed over it. The conditions for the flexibility to run it parallel with the floor joists depend on the existing subfloor's thickness is ¾" and that there is no deflection found when walked on. If up and down flexes are detected when you walk on OSB subfloor, have an extra layer of 3/8" thick plywood underlayment added by gluing and screwing it down to increase stability. For the same purpose, another option is the installation of 2x6 blocking between floor joists.
4. Plywood subfloor
One of the most common exterior subfloor material used in homes is CDX plywood. Although CDX indicates plywood's lowest class, CDX is thick and trusted in construction industry. Typically, plywood subfloors are made of thin sheets of southern pine veneer, which are then cross-laminated and glued together. The result is the formation of 4"x8" sheets with 5/8" or ¾" thickness. CDX plywood sheets' tongue and groove edges allow each adjoining sheet to interlock, bringing about a secure and strong subfloor for any hardwood finished flooring. CDX plywood subfloors work well with thick solid hardwood flooring of over 5/8" or ¾" thickness installed directly over them. It is worth noting that in all hardwood flooring installation, the standard board direction is across the floor joists, regardless of the thickness, to ensure the stability and strength of the whole floor structure. Sometimes you can run the hardwood flooring boards in another direction, which is parallel with the -- joists. This is possible when the existing sub floor is solid, flat, and ¾" thick; no deflection detected between joists; and the space between the -- joists is 16 inches or closer. The promising effect is a room that appears larger than usual.
5. Old floors as subfloor
Wooderra understands that you may prefer making use of the existing hardwood flooring because of different factors, such as budget, convenience, and so on. One of the important reasons why the removal of existing flooring is strongly recommended is that by doing so, you can fix any loose and squeaky subflooring prior to the new hardwood flooring installation. One reason to remove an old flooring covering with extreme caution is when there is a suspicion of asbestos. Old houses built prior to 1950s often feature vinyl tiles that contain asbestos. If you are unsure, have a safety crew take a sample test of asbestos before deciding to remove the floor. If asbestos test is positive, flooring of any kind containing them must be removed by a professional abatement team. The following are the two common existing floors used as subfloors:
- Vinyl floor:
Existing vinyl floor functions well as subfloor only when the new hardwood flooring is installed in a mechanically fastening manner. This will allow the vinyl floor covering to act as a vapor barrier.
The glue-down application is not recommended as it will bring around poor adhesive bonding effect. Always consult with the adhesive manufacturer for recommendation.
- Old hardwood flooring:
It is possible to install the new hardwood flooring over it but it is likely to be somewhat more complicated than other projects.
When the old wood flooring expands or contracts, open gaps and potential waviness on the new hardwood flooring will result if it is installed parallel to the old wood flooring's direction. Hence, go for a 90 degree angle board direction installation.
On the other hand, if the parallel direction is desired, a layer of 3/8" thick plywood underlayment must be screwed it down over the old wood flooring. As a separation, the underlayment allows your new hardwood flooring to run in any direction you wish.
V, Subfloor determines the lasting value
A hardwood flooring has an unsurpassed beauty that makes it never go out of style. It increases the value of your house and is usually a huge selling point if you put it on the market. Its durability is another major factor which make hardwood floors worth the investment. Therefore, to ensure and to extend its structural, aesthetic and market value, a sound and solid subfloor is essential.
Leave Reply